
How to Record an Oral History Interview Before It’s Too Late
Heart of the Family is a participant in the Amazon Services LLC Associate Programs and other affiliate services. This means that thefamilyheart.com receives a small commission by linking to Amazon.com and other sites at no cost to the readers.
My mother died in 2001. I had access to recording equipment; as a teacher, I used a video camera in my classroom almost every day, and I owned a separate audio recording device. But I never used any of it to record my mother’s voice.
Why not? For starters, my mother hated being photographed or recorded. I can’t tell you how many photos I have of nothing but her hand, thrown up the moment someone pointed a camera in her direction. She was a deeply unwilling subject.
But beyond that, I thought I had more time with her. I think most of us make that assumption: we always think we’ll have more time.
I did not have more time. My mother died unexpectedly from complications following a surgery that was supposed to improve her quality of life.
And today, I have no audio recordings of my mother. My mother’s voice is gone.
Every Family Has a Storyteller
Maybe it’s your grandmother, who can describe the house she grew up in so vividly that you can almost smell the kitchen. Maybe it’s an uncle who remembers exactly what he was doing the day Apollo 11 landed on the moon. Or maybe it’s a parent or grandparent who has never told you much at all, and you’ve always wondered why.
Here’s the hard truth: those stories are irreplaceable, and they exist only as long as the people who carry them are here to tell them. No record set, no DNA test, and no census entry can capture the sound of your mother’s laugh or the way your grandfather paused before he talked about the war.
Recording an oral history interview is one of the most meaningful things you can do for your family, and it doesn’t require fancy equipment or professional training. It just takes a little preparation and the willingness to sit down, press record, and listen.

What Is an Oral History Interview?
An oral history interview is a recorded conversation, typically audio or video, in which a person shares their memories, experiences, and reflections in their own words. Unlike a casual chat at the dinner table, an oral history interview is intentional. You’re asking questions with the goal of capturing and preserving someone’s story for the long term.
For genealogists, oral histories are primary sources. They fill in the gaps that documents leave behind: the why behind a family’s move across the country, the personality of an ancestor who appears only as a name on a census, or the traditions that shaped how your family celebrated holidays, grieved losses, or marked milestones.
Oral histories also capture things that simply don’t appear in the records: family recipes passed down by memory, nicknames, feuds, inside jokes, and the everyday texture of life that makes a family a family.
Who Should You Interview?
The short answer: anyone who’s willing, starting with the oldest generation.
The longer answer is that you should think broadly. The most obvious candidates are grandparents, parents, aunts, and uncles. But don’t overlook these people:
- The family historian. Every family seems to have one person who kept the photos, remembered the birthdays, and knew which cousin married whom. That person’s knowledge is a goldmine.
- The quiet one. Sometimes the family members who say the least have the most interesting stories. They just haven’t been asked to tell them.
- Non-relatives with family knowledge. A longtime neighbor, a parent’s childhood best friend, or a former coworker may remember things your own relatives have forgotten.
- Younger family members. While the priority is often the oldest generation, consider interviewing parents, siblings, or even children. Their perspectives on family life will be valuable to future generations, too.
If you’re not sure where to start, ask yourself: Whose stories would I most regret losing? Start there.

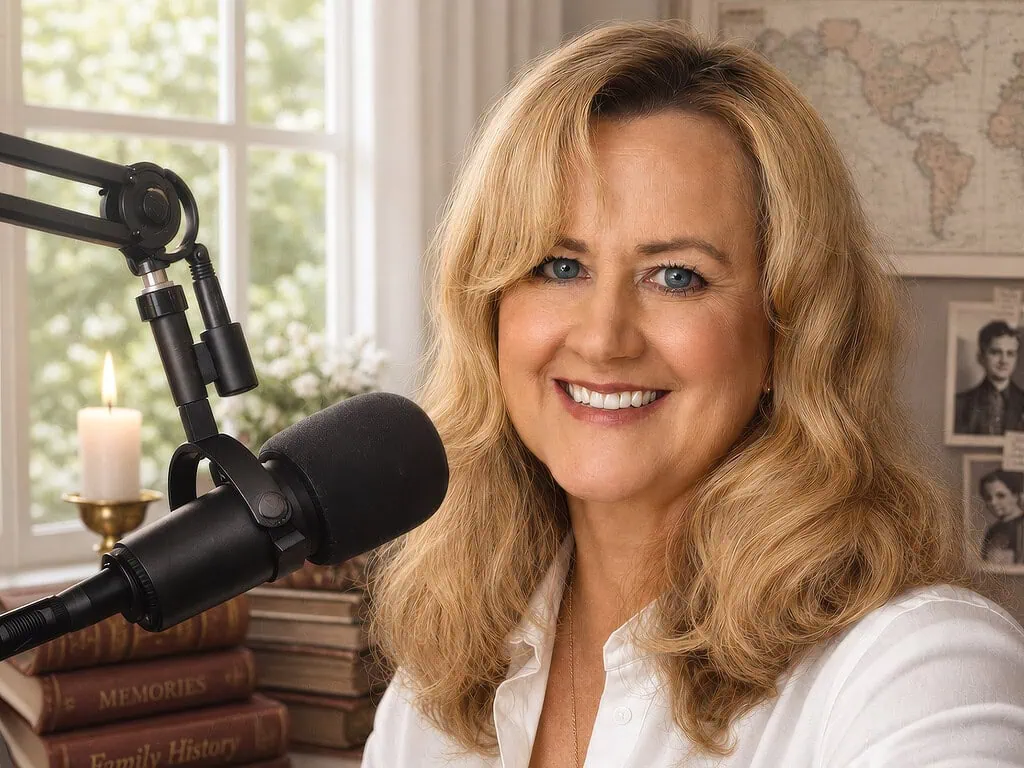
Equipment: What You Actually Need
One of the biggest myths about oral history recording is that you need expensive, professional-grade equipment. You don’t. What you need is something that records clearly and reliably. Here’s a breakdown by approach:
A Smartphone (Your Simplest Option)
You almost certainly already own the most important piece of equipment: your phone. Modern smartphones record surprisingly good audio and video. Use the built-in voice memo app (Voice Memos on iPhone, Recorder on most Android devices) or download a free recording app.
A few tips for getting better results with your phone:
- Place the phone on a stable surface between you and the person you’re interviewing, with the microphone facing them.
- Turn off notifications before you start. An interruption can break the flow of a story, and buzzing sounds will be picked up on the recording.
- Do a short test recording first to check the audio levels and background noise.
- Keep the phone plugged in or fully charged. Interviews often run longer than you expect.
Stepping It Up: External Microphones and Recorders
If you want better audio quality (and I’d recommend it if you plan to do this more than once), consider a few affordable upgrades:
- A lavalier (clip-on) microphone that plugs into your phone. These start around $25 and dramatically improve voice clarity. Look for one that connects via Bluetooth, so your interviewee can clip it to their collar and move around comfortably.
- A USB microphone if you’re recording on a laptop. The Logitech Blue Yeti and FIFINE USB/XLR are popular choices in the $50–$100 range.
- A portable digital recorder, such as the Sony ICD-PX370 or the Zoom H1 Handheld Recorder. These are compact, produce excellent audio, and are worth the investment if you plan to conduct multiple audio-only interviews.
Video Recording
Video adds a powerful layer to oral history because it captures facial expressions, gestures, and emotion that audio alone can’t convey. If you want to record video:
- A smartphone on a tripod works well. A basic phone tripod costs around $20–$25.
- Position the camera at eye level, facing the person being interviewed.
- Make sure the lighting is good. Natural light from a window is ideal, but avoid having the window directly behind your interviewee, as this will make them appear as a silhouette.
- Frame the shot from about the chest up so the viewer can see the person’s face and hands.
Whether you choose audio or video, the most important thing is that you record something. Don’t let the pursuit of perfect equipment keep you from getting started.

Preparing for the Interview
Preparation is what separates a great oral history interview from a rambling conversation that’s hard to follow later. You don’t need a rigid script, but you do need a plan.
Do Your Homework
Before the interview, gather what you already know about the person’s life. Review family photos, documents, and any notes you have. This does two things: it helps you ask better, more specific questions, and it shows your interviewee that you take their story seriously.
If you have old family photographs, bring a few to the interview. Photos are incredible conversation starters and memory triggers. A picture of a house, a holiday gathering, or a school portrait can unlock stories your interviewee hadn’t thought about in years.
Prepare Your Questions
I recommend writing out a list of 15–25 questions ahead of time. You won’t necessarily use all of them, and the conversation will take its own turns, but having a list keeps you from drawing a blank in the moment.
Here are some categories and sample questions to get you started:
Early Life and Family
- Where were you born, and what was the town/neighborhood like when you were growing up?
- What are your earliest memories?
- Tell me about your parents. What were they like? What did they do for a living?
- Did you have a close relationship with your grandparents? What do you remember about them?
- What was your house like? Can you walk me through it, room by room?
School and Coming of Age
- What was school like for you? Did you have a favorite teacher or subject?
- What did you and your friends do for fun?
- When did you start working, and what was your first job?
Relationships and Family Life
- How did you meet your spouse/partner?
- What was your wedding like?
- What was it like becoming a parent for the first time?
- Which family traditions were most important to you?
Work and Community
- Tell me about your career. What are you most proud of?
- Were you involved in your community, church, or other organizations?
Historical Events
- Do you remember where you were when [insert historical event] happened?
- How did [insert war/economic event/social change] affect your family?
General Reflection
- What’s the best advice you’ve ever received?
- Is there anything you wish you had done differently?
- What do you want your grandchildren (or future generations) to know about you?
- Is there a story about our family that you think should never be forgotten?
A Note About Sensitive Topics
Some of the most valuable stories are also the most difficult ones to talk about: immigration hardships, wartime experiences, family estrangements, loss. Be prepared to approach these gently. Let the interviewee set the pace. If they want to talk about something difficult, listen. If they don’t, respect that boundary. You can always say, “We can come back to that if you’d like, or we can move on.”
The goal is not to interrogate. It’s to create a safe, comfortable space where someone feels honored to share their story.
During the Interview: Tips for Success
Set the Scene
Choose a quiet, comfortable location. The person’s own home is often the best choice because they’ll feel relaxed and may have photos or objects nearby that can spark memories.
Before you press record, take a moment to state the basics at the beginning of the recording: the date, the location, who is being interviewed, and who is conducting the interview. Future listeners (and future you) will thank you for this.
Let Them Talk
This is the most important advice I can give you: resist the urge to fill silences. When someone pauses, they’re often thinking, remembering, gathering their thoughts. Give them space. Some of the best stories come after a long pause.
Avoid interrupting, even to agree or express surprise. Nodding and making eye contact are enough to show that you’re engaged. If you’re recording audio only, small verbal cues like “mm-hm” are fine, but keep them brief.
Follow the Story
Your question list is a guide, not a script. If your grandmother starts telling you about her first job and it leads to a story about meeting your grandfather, follow that thread. You can always circle back to your planned questions later.
Some of the best follow-up prompts are simple:
- “Tell me more about that.”
- “What happened next?”
- “How did that make you feel?”
- “Do you remember what that looked like?”
Watch for Fatigue
Older interviewees may tire after 45 minutes to an hour. Watch for signs of fatigue and offer breaks. It’s perfectly fine to split an interview into two or three shorter sessions. In fact, this can work in your favor: your interviewee may remember additional details between sessions.

After the Interview: Preserve What You’ve Captured
Recording the interview is only half the job. Preserving it properly ensures that your family can access and enjoy it for generations.
Back It Up Immediately
As soon as the interview is over, make at least two copies of the recording. Transfer the file from your phone or recorder to your computer, and then back it up to a cloud storage service (Dropbox, Google Drive, Microsoft’s OneDrive, Backblaze, or something similar) and/or an external hard drive.
Storage devices fail. Cloud services change. Having copies in more than one place protects against loss.
Label and Organize
Name your files clearly. Something like “JONES-Susan-oral-history-interview-2026-05-10-part-1.mp3” is far more useful than “Recording_01486.m4a.” Always include the basics: the interviewee’s name, the recording date, and a “part” number if the interview spans multiple files.
If you took notes during or after the interview, save those alongside the recording.
Transcribe It
A written transcript makes your oral history searchable and accessible in ways that audio and video alone cannot. Transcription is time-consuming if you do it manually (expect roughly four hours of work for every one hour of audio), but there are tools that can help:
- Apps like Otter.ai and Rev offer AI-assisted transcription that you can then review and correct.
- The native Apple Voice Memo app is useful for transcribing shorter recordings.
- Video editing software like Adobe Premiere automatically generates a transcript and helps you create captions.
- Google Docs voice typing is a free option if you’re willing to play the recording and let it transcribe in real time (results will vary).
- Note-taking app Goodnotes 6 creates audio transcriptions on devices that meet the technical requirements (I use a 13-inch iPad Air).
- Even Canva now offers a free audio-to-text converter app.
- If accuracy matters and you have the budget, professional transcription services typically charge $1–$3 per audio minute.
Even a rough transcript is better than none. Future family members who want to search for a specific name, place, or story will be grateful.
Share It
An oral history that sits on a hard drive and never gets shared doesn’t fulfill its purpose. Consider these options for sharing:
- Upload the recording (or clips from it) to a private family website, a shared Dropbox folder, or a platform like StoryCorps (with permission from the interviewee).
- Play portions at a family reunion or holiday gathering.
- Include excerpts in a family history book or newsletter.
- Gift a USB drive with the recording and a printed transcript to family members. This makes a meaningful holiday or birthday gift.
Get Started Today
I can’t go back and record my mother’s voice. I can’t sit her down at the kitchen table, press record, and ask her to tell me about growing up, or the day she married my father, or what she felt the first time she held me as a baby. That opportunity is gone, and no amount of research or technology will bring it back.
But you may still have that chance. If there is someone in your life whose stories you want to preserve, please don’t assume that you’ll have more time. You might. But you might not.
You don’t need the perfect setup. You don’t need professional equipment. You just need a recording device, a few good questions, and the willingness to sit down and listen.
Pick up the phone today and ask. Most people are honored when someone cares enough to say, “I want to hear your story.” Then, charge up your phone, review your questions, and press record.
Those recordings will become some of the most treasured items in your family history collection. I can promise you that.


This post contains affiliate links. I may receive a small commission if you choose to make a purchase, but it does not add anything extra to the price you pay. For more, please read my full Disclosure Statement. I appreciate your support!

 12")


Excellent advice! And it is so true that an oral history will become treasured by the family as time goes on. My late father-in-law sat for two “interviews” with his eldest son 35+ years ago, and although his memory wasn’t accurate on all points, we learned so much and still reread the transcript today. Plus we are happy to be able to listen to his voice even after these many years.
Thank you for sharing your story! What a gift that your brother-in-law had the foresight to sit down and do those interviews 35+ years ago. And you make such an important point about memory not being perfect. It doesn’t have to be. The details might not always be accurate, but the stories, the perspective, and especially the voice are what make an oral history irreplaceable. I love that your family still rereads the transcript and listens to the recordings. That’s exactly what preservation looks like in practice.
Great tips, Elizabeth. I thought I had more time with my mom as well, and I regret not recording her or asking more questions. Your mom sounds like me (as well as my mom); I won’t let my family take photos of me either, and my hand usually goes up right away as well. 😉
I’m so sorry you share that same regret as me, Diane. It’s a hard one to carry, isn’t it? And I have to laugh a little about the hand going up, because I completely understand it. My mother would have loved knowing she wasn’t alone in that! Maybe this is our sign that we need to let our families sneak in a few photos and recordings while they can. They’ll thank us for it someday, even if we grumble about it now. 🥲
Love your tips. We all wished we had asked our parents and grandparents these kinds of questions. I sure wish I had recorded them when I did ask.
Thank you, Lisa! It sounds like you did ask, though, and that counts for a lot. Even without a recording, the fact that you had those conversations means you carry stories that might otherwise have been lost. If there’s anyone still around to ask, it’s never too late to press record. 🎤
Wonderful advice and so many great resources you’ve provided. What an awesome one-stop article for beginners, and a great refresher for all of us, not to mention a reminder to take that time now to record our loved ones. I have a very precious voicemail from my dad where he called to wish me a happy birthday and he rambled on and on, because it was the time when we knew that if you talked a while, sometimes they would pick up, remember? I can tell by his voice that he was hoping to get me in person, and its so sweet. “So, well, yeah. I love you, happy birthday dear. Maybe I can talk to you sometime…later.” I’m so glad to have it recorded.
Oh, this one got me. 🥹 And yes, I absolutely remember doing that! You’d start talking to the machine, dragging it out, hoping to hear that little click of someone picking up on the other end. I actually saved my mother’s answering machine after she died, hoping I could at least hear her voice on the outgoing message. I had completely forgotten that she was so shy that she made me record it for her. So it’s just me on there! 😕 That voicemail you have is such a perfect example of why every recording matters, even the ones we don’t plan. I’m sure you can hear his whole personality in that message: the hoping you’d pick up, the rambling to buy time, the little pause before ‘So, well, yeah.’ That’s not just a voicemail. That’s your dad. Thank you so much for sharing your story here. I hope some readers will see this and immediately go check their old voicemails… and I hope they save every single one!